Hierarchical Grid Load On Demand
The Ignite UI for Angular IgxHierarchicalGrid allows fast rendering by requesting the minimum amount of data to be retrieved from the server so that the user can see the result in view and interact with the visible data as quickly as possible. Initially only the root grid’s data is retrieved and rendered, only after the user expands a row containing a child grid, he will receive the data for that particular child grid. This mechanism, also known as Load on Demand, can be easily configured to work with any remote data.
This topic demonstrates how to configure Load on Demand by requesting data from a Northwind WebAPI. Here's the working demo and later we will go through it step by step and describe the process of creating it.
Angular Hierarchical Grid Load On Demand Example
Hierarchical Grid Setup
Let's setup our hierarchical grid. First we will define our hierarchical grid template with the levels of hierarchy that we expect to have. We know that our root grid primaryKey for the customers is their customerId, for their orders on the first level - orderId and respectively for order details - productId. Knowing each database table and their keys allows us to define our initial template:
<igx-hierarchical-grid #hGrid [primaryKey]="'customerId'" [autoGenerate]="true" [height]="'600px'" [width]="'100%'">
    <igx-row-island [key]="'Orders'" [primaryKey]="'orderId'" [autoGenerate]="true">
        <igx-row-island [key]="'Details'" [primaryKey]="'productId'" [autoGenerate]="true">
        </igx-row-island>
    </igx-row-island>
</igx-hierarchical-grid>
We will easily set the data of the root grid after getting its data from the endpoint in our code later, since we can use the #hGrid reference. Setting the data for any child that has been expanded is a bit different.
When a row is expanded for the first time, a new child IgxHierarchicalGrid is rendered for it and we need to get the reference for the newly created grid to set its data. That is why each IgxRowIsland component provides the gridCreated event that is fired when a new child grid is created for that specific row island. We can use that to get the reference we need for the new grid, request its data from the endpoint, and apply it.
We can use one method for all row islands since the endpoint only needs the key of the row island, the primary key of the parent row, and its unique identifier. All this information can be accessed directly from the event arguments.
Setup of loading indication
Now let's improve the user experience by informing the user that the data is still loading so he doesn't have to look at an empty grid in the meantime. That's why the IgxHierarchicalGrid supports a loading indicator that can be displayed while the grid is empty.
We display a loading indicator by setting the isLoading property to true while there is no data. We need to set it initially for the root grid and also when creating new child grids, until their data is loaded. We could always set it to true in our template, but we want to hide it (by setting it to false) and display that the grid has no data if the service returns an empty array.
Finally, let's turn the autoGenerate property off and define the columns collection in the markup.
The template file hierarchical-grid-lod.component.html, after all changes added, would look like this:
    <igx-hierarchical-grid #hGrid [data]="remoteData" [isLoading]="true" [primaryKey]="'customerId'" [autoGenerate]="false" [height]="'580px'" [width]="'100%'" [igxPreventDocumentScroll]="true" [allowAdvancedFiltering]="true" [schema]="schema" (advancedFilteringExpressionsTreeChange)="refreshRootGridData()">
            <igx-grid-toolbar></igx-grid-toolbar>

            <igx-column field="customerId" [dataType]="'string'"></igx-column>
            <igx-column field="companyName" [dataType]="'string'"></igx-column>
            <igx-column field="contactName" [dataType]="'string'"></igx-column>
            <igx-column field="contactTitle" [dataType]="'string'"></igx-column>

        <igx-row-island #rowIsland1 [key]="'Orders'" [primaryKey]="'orderId'" [autoGenerate]="false" (gridCreated)="gridCreated($event)">
            <igx-column field="orderId"></igx-column>
            <igx-column field="customerId"></igx-column>
            <igx-column field="shipVia"></igx-column>
            <igx-column field="freight"></igx-column>

            <igx-row-island #rowIsland2 [key]="'Details'" [primaryKey]="'orderId'" [autoGenerate]="false" (gridCreated)="gridCreated($event)">
                <igx-column field="orderId"></igx-column>
                <igx-column field="productId"></igx-column>
                <igx-column field="unitPrice"></igx-column>
                <igx-column field="quantity"></igx-column>
                <igx-column field="discount"></igx-column>
            </igx-row-island>
        </igx-row-island>
    </igx-hierarchical-grid>
Advanced filtering
In order to use Advanced Filtering in the IgxHierarchicalGrid with load on demand, you need to set the schema property of the grid to an entity with hierarchical structure, specifying child entities and fields with their data types. This ensures that filtering expressions with nested queries can be created even before any child grid data is loaded and that the grid can correctly interpret and apply these filters to the data.
In our case, this is the correct hierarchical structure:
public schema: EntityType[] = [
    {
        name: 'Customers',
        fields: [
            { field: 'customerId', dataType: 'string' },
            { field: 'companyName', dataType: 'string' },
            { field: 'contactName', dataType: 'string' },
            { field: 'contactTitle', dataType: 'string' }
        ],
        childEntities: [
            {
                name: 'Orders',
                fields: [
                    { field: 'customerId', dataType: 'string' },
                    { field: 'orderId', dataType: 'number' },
                    { field: 'employeeId', dataType: 'number' },
                    { field: 'shipVia', dataType: 'string' },
                    { field: 'freight', dataType: 'number' }
                ],
                childEntities: [
                    {
                        name: 'Details',
                        fields: [
                            { field: 'orderId', dataType: 'number' },
                            { field: 'productId', dataType: 'number' },
                            { field: 'unitPrice', dataType: 'number' },
                            { field: 'quantity', dataType: 'number' },
                            { field: 'discount', dataType: 'number' }
                        ]
                    }
                ]
            }
        ]
    }
];
Setting initial filter
Now let's add initial filtering rules to our grid so that the root grid is filtered when first loaded. We will create a FilteringExpressionsTree and set it to the advancedFilteringExpressionsTree property of the IgxHierarchicalGrid using the ngOnInit lifecycle hook.
Let's say we want to filter customers that have order's freight at least 500. We will take advantage of the ability to create nested queries in the filtering expressions and this is the result:
public ngOnInit() {
    const ordersTree = new FilteringExpressionsTree(FilteringLogic.And, undefined, 'Orders', ['customerId']);
    ordersTree.filteringOperands.push({
        fieldName: 'freight',
        ignoreCase: false,
        condition: IgxNumberFilteringOperand.instance().condition('greaterThanOrEqualTo'),
        conditionName: IgxNumberFilteringOperand.instance().condition('greaterThanOrEqualTo').name,
        searchVal: '500'
    });

    const customersTree = new FilteringExpressionsTree(FilteringLogic.And, undefined, 'Customers', ['customerId', 'companyName', 'contactName', 'contactTitle']);
    customersTree.filteringOperands.push({
        fieldName: 'customerId',
        condition: IgxStringFilteringOperand.instance().condition('inQuery'),
        conditionName: IgxStringFilteringOperand.instance().condition('inQuery').name,
        ignoreCase: false,
        searchTree: ordersTree
    });
    this.hGrid.advancedFilteringExpressionsTree = customersTree;
}
Connecting to the endpoint
We will be communicating with the endpoint over HTTP protocol using the XMLHttpRequest interface the browsers provide. In order to achieve this more easily we will use Angular's HttpClient module that offers a simplified client HTTP API.
Getting root grid data
The Northwind WebAPI provides us with a POST endpoint that accepts an IFilteringExpressionsTree as a parameter and we will use it in order to take advantage of the Advanced Filtering functionality in the IgxHierarchicalGrid and filter records in the root grid. We will do this in refreshRootGridData method:
public refreshRootGridData() {
    const tree = this.hGrid.advancedFilteringExpressionsTree;
    this.hGrid.isLoading = true;
    if (tree) {
        this.http.post(`${API_ENDPOINT}/QueryBuilder/ExecuteQuery`, tree).subscribe(data =>{
            this.remoteData = Object.values(data)[0];
            this.hGrid.isLoading = false;
            this.hGrid.cdr.detectChanges();
        });
    } else {
        this.http.get(`${API_ENDPOINT}/Customers`).subscribe(data => {
            this.remoteData = Object.values(data);
            this.hGrid.isLoading = false;
            this.hGrid.cdr.detectChanges();
        });
    }
}
As you can see this.http will be a reference to our HttpCLient module. The subscribe method is part of Angular's Observable and is used to handle the asynchronous response from the HTTP request. When the data is received, it assigns the fetched data to the relevant grid, updates its loading state to false, and triggers change detection to ensure the UI reflects the changes.
In order to load the data after the root grid is initially rendered, we will use the ngAfterViewInit lifecycle hook and call the refreshRootGridData method:
public ngAfterViewInit() {
    this.refreshRootGridData();
}
Getting child grids data
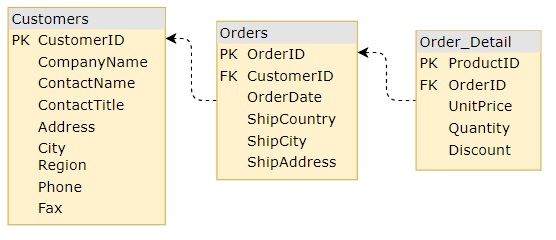
Next we will define how we should build our URL for the GET request in order to get the data for our child grids. This is the visual representation of the relations between the tables:
Finally, we need to implement our gridCreated method that will request data for any new child grid created. It will be similar to getting the root level grid data, just this time we will use the data provided in the event gridCreated and build our URL with it:
public gridCreated(event: IGridCreatedEventArgs) {
    event.grid.isLoading = true;
    const url = this.buildUrl(event);
    this.http.get(url).subscribe(data => {
        event.grid.data = Object.values(data);
        event.grid.isLoading = false;
        this.hGrid.cdr.detectChanges();
    });
}

private buildUrl(event: IGridCreatedEventArgs) {
    const parentKey = (event.grid.parent as any).key ?? this.schema[0].name;
    const url = `${API_ENDPOINT}/${parentKey}/${event.parentID}/${event.owner.key}`;
    return url;
}
API References
Additional Resources
Our community is active and always welcoming to new ideas. GitHub