
Write Applications Fast Using Ignite UI Grid
Introduction
Write web applications faster with Ignite UI for JavaScript. You can use the Ignite UI for JavaScript library to help quickly solve complex LOB requirements in HTML5, jQuery, Angular, React, or ASP.NET MVC. Use the Ignite UI for JavaScript library to add a fast, responsive grid with many features such as pagination, sorting, search, virtualization, and more. The controls, data visualizations, charts, and framework elements in Ignite UI for JavaScript are simple to configure and customize, allowing you to create a web application quickly.
In addition to seamlessly rendering large sets of data, the Ignite UI for JavaScript Grid features valuable tools such as filtering, paging, and sorting. Learn more about Ignite UI for JavaScript features on the Ignite UI product page. You can also learn more about Angular in Angular Essentials, a free eBook published by Infragistics.
Lesson Objectives
- Add Ignite UI for JavaScript grid using the Ignite UI for JavaScript Angular components.
- Configure grid columns.
See Data Grid for more information on the controls used in this lesson.
At the end of this lesson, you will have a working grid configured for columns in an Angular application. See the Ignite UI for JavaScript Angular components page on Github to learn more about working with Ignite UI for JavaScript in Angular.
Setting up the Project
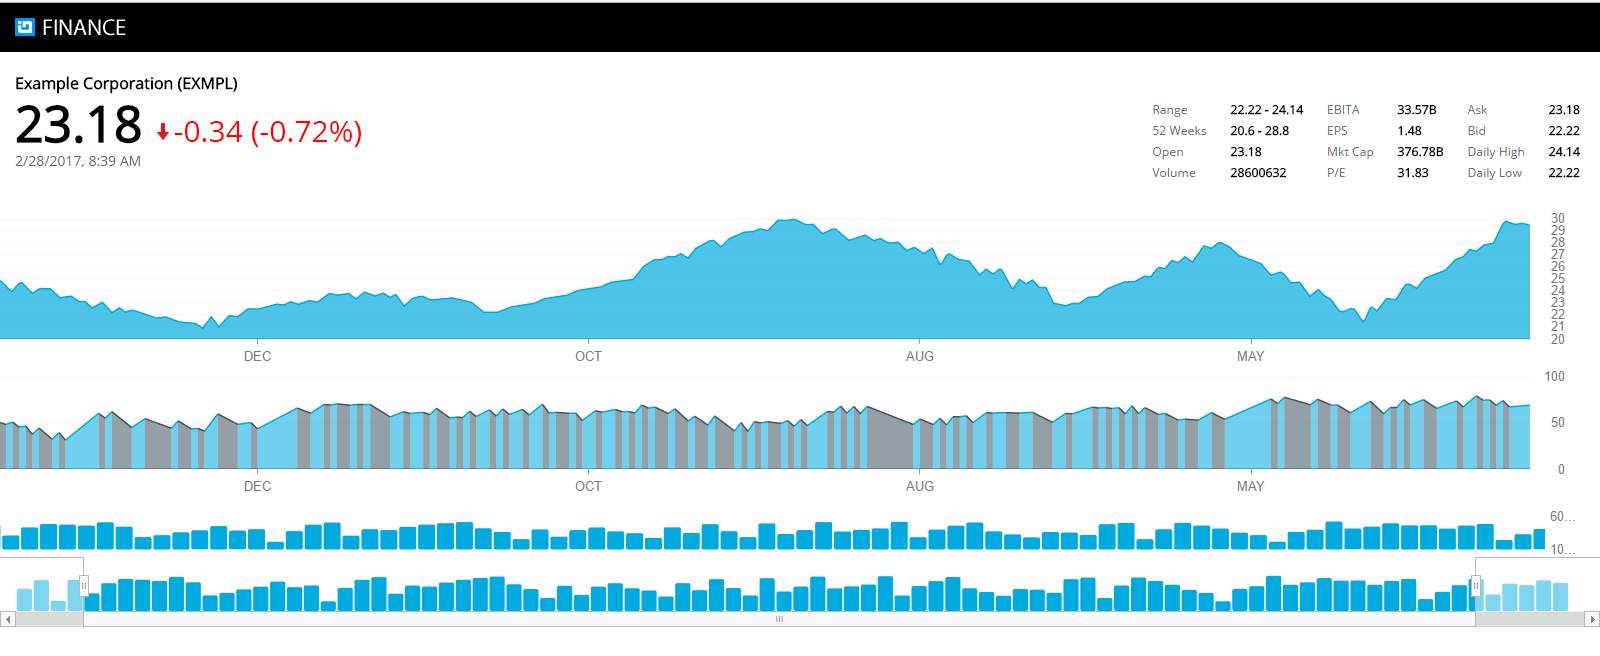
Download the starter project for this lesson by clicking here. If the project setup is correct, you will have a running Angular application as shown in the image below:
Step 1 Import and Declare the Component
To work with Ignite UI for JavaScript Angular components, you must import and declare them in the module. For example, to use the igGrid component in an Angular application, import and declare the IgGridComponent in the application module.
In the project, navigate to the Finance App folder and then to the app folder. Open the file app.module.ts, and add the import statements below, just after the existing import statements.
import{IgGridComponent} from 'igniteui-angular2';
import {GridComponent} from './grid.component';
After importing the required components, you must declare them in the application module. Add IgGridComponent and GridComponent in the AppModule’s declaration array. Modify @NgModule decorator in app.module.ts as shown below:
@NgModule({
imports: [BrowserModule,HttpModule],
declarations: [AppComponent,
              IgZoombarComponent,
              IgDataChartComponent,
              PriceChartComponent,
              InfoComponent,
              IndicatorChartComponent,
              VolumeChartComponent,
              IgGridComponent, GridComponent],
              providers: [AppService],
              bootstrap: [AppComponent]
})
export class AppModule { }
You have added IgGridComponent and GridComponent in the declaration array of AppModule module. We will examine other added components and properties (like providers) in subsequent lessons.
Step 2 Create a Data Source
You need data to bind to the grid. This data can be a JavaScript array or a JSON object array, and can be local or provided by a REST service.
Ideally, you should create a function to return data in an Angular service so you can use the data function in multiple components. For this lesson, there is already a function called getData in GridComponent class, which returns a JSON object array.
In the app folder, open the file grid.component.ts and find the getData() function. In later lessons, you will learn how to create a grid that uses data from the REST services.
Step 3 Get Data
To use data returned from the getData() function, call the function inside Angular ngOnInit() life cycle hook and assign a returned value to the GridComponent property.
Learn more about Angular Life Cycle hooks.
In the app folder, open the file grid.component.ts and modify the ngOnInit() function as shown below:
ngOnInit(){
  this.stocks = this.getData();
}
Step 4 Create a Grid
The Ignite UI for JavaScript Angular Grid component can be used like any other component. In the app folder, open the file grid.component.html, and add the code as shown below:
<ig-grid widgetId="grid1" [dataSource]="stocks" [autoGenerateColumns]="true">Step 5 Use in an Application
To use the GridComponent in an application: In the app folder, open the app.component.html file and add the code shown below, at the end of all of the markup, below the element.
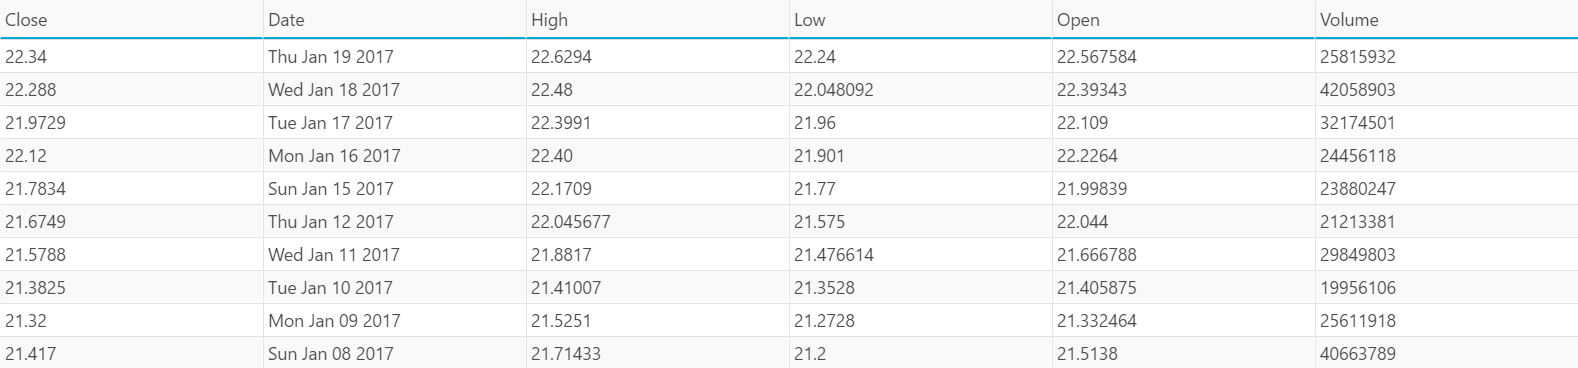
<grid></grid>Navigate to the application and scroll down to the bottom of the page to find the grid added as shown in the image below:
Step 6 Configure Columns of the Grid
In Step 4, you created a grid by setting the autoGenerateColumns property to true. The grid columns were generated automatically, but you can also configure columns manually. You can configure columns and other features such as paging, sorting, and filtering of the grid in the component class.
To configure columns: In the app folder, open grid.component.ts file, and update ngOnInit() function in grid.component.ts file with the listing below:
ngOnInit() {
  this.stocks = this.getData();
  this.gridId = "Grid1";
  this.gridOptions = {
    dataSource: this.stocks,
    autoGenerateColumns: false,
    columns: [
        { headerText: "CLOSE", key: "Close", dataType: "number" },
        { headerText: "DATE", key: "Date", dataType: "string" },
        { headerText: "HIGH", key: "High", dataType: "number" },
        { headerText: "LOW", key: "Low", dataType: "number" },
        { headerText: "OPEN", key: "Open", dataType: "number" },
        { headerText: "VOLUME", key: "Volume", dataType: "number" }
    ]
  }
}
Step 7 Modify the Grid with Configured Columns
Ignite UI for JavaScript’s Angular grid options and widgetId properties are enabled for two-way data binding, so any changes in the source will be reflected on the grid. To set options and widgetId properties: In the app folder, open the file grid.component.html, and modify it as shown below:
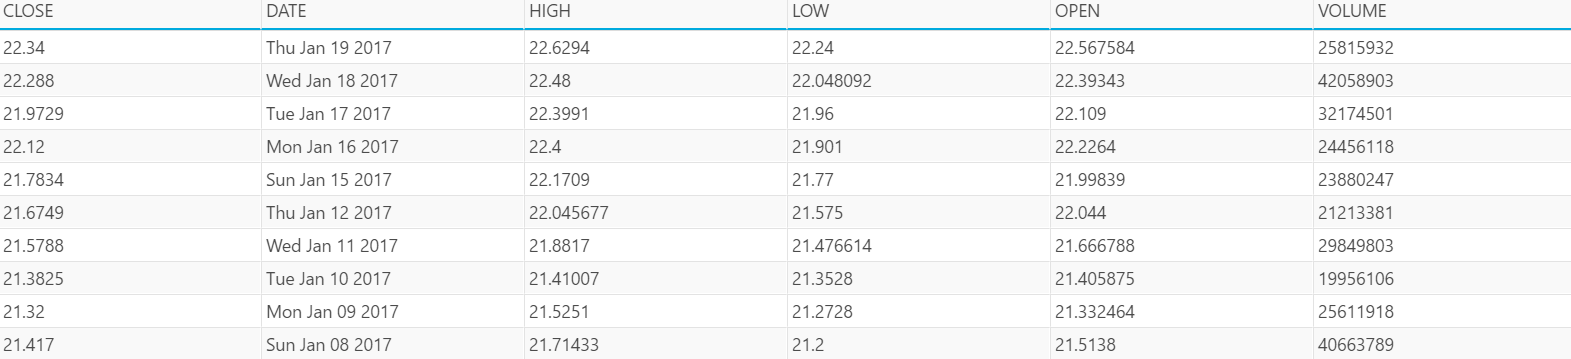
<ig-grid [(options)]= "gridOptions" [(widgetId)]="gridId">Navigate to the application and scroll to the bottom of the page to find the grid added as shown below:
Conclusion
Ignite UI for JavaScript can help you write web applications more quickly. In addition to Angular, Ignite UI for JavaScript may be used with React, AngularJS, jQuery, and ASP.NET MVC.