
Sort, Filter, and Page Fast With the Ignite UI for JavaScript Grid
Introduction
Ignite UI for JavaScript enables you to write web applications faster and solve complex LOB requirements more quickly. You can use the Ignite UI for JavaScript library with HTML5, jQuery, Angular, React, or ASP.NET MVC. The Ignite UI for JavaScript library lets you quickly and efficiently add a fast, responsive grid with features like pagination, sorting, search, virtualization, and more.
In addition to seamlessly rendering large sets of data, the Ignite UI for JavaScript Grid is loaded with many other features, such as filtering, paging, and sorting. You can learn more about Ignite UI for JavaScript features on the Ignite UI product page; you can also learn more about Angular in Angular Essentials, a free eBook published by Infragistics.
In this lesson, you will learn how to configure various important features of Ignite UI for JavaScript Grid.
Lesson Objectives
- Enable sorting on the grid.
- Enable filters on the grid.
- Enable paging on the grid.
For more information on the controls used in this lesson, see Data Grid.
At the end of this lesson, you will have an Ignite UI for JavaScript Grid configured for basic features such as sorting, filtering, and pagination in an Angular application.
You can learn more about Ignite UI for JavaScript Angular components.
Setting up the Project
You may download the starter project for this lesson by clicking here. (You can also download the final project by clicking here.)
After downloading the project, navigate to the directory and run the commands below:
- npm install
- npm start
Execute the npm install command to install all dependencies, then execute the npm start command to run the Angular application. If the project setup is correct, you will have a running Angular application as shown in the image below.
Scroll to the bottom of the application to find the Ignite UI Grid. At the end of the lesson, this grid will be configured with sorting, paging, and filtering features.
Step 1 Enable Sorting
You can enable sorting on Ignite UI for JavaScript Grid by adding a feature with the name “Sorting” in the grid. Ignite UI Grid supports local and remote sorting.
To enable local sorting, create an object with the following properties and add it to the features property of the grid option:
- name : set to Sorting
- type : set to local
To do this, in the App folder, open the file grid.component.ts. Just after the getData() function, add the getGridFeatures() function shown below:
getGridFeatures()
{
  return [
  {
    name: "Sorting",
    type: "local"
  }
  ];
}
Next, add sorting features to the grid options. In the this.gridOptions, add a new property called feature and set its value to this.getGridFeatures(). The updated ngOnInit() function in the grid.component.ts file will look like the code shown below:
ngOnInit() {
this.stocks = this.getData();
this.gridId = "grid1"
this.gridOptions = {
dataSource: this.stocks,
autoGenerateColumns: true,
features: this.getGridFeatures()
}
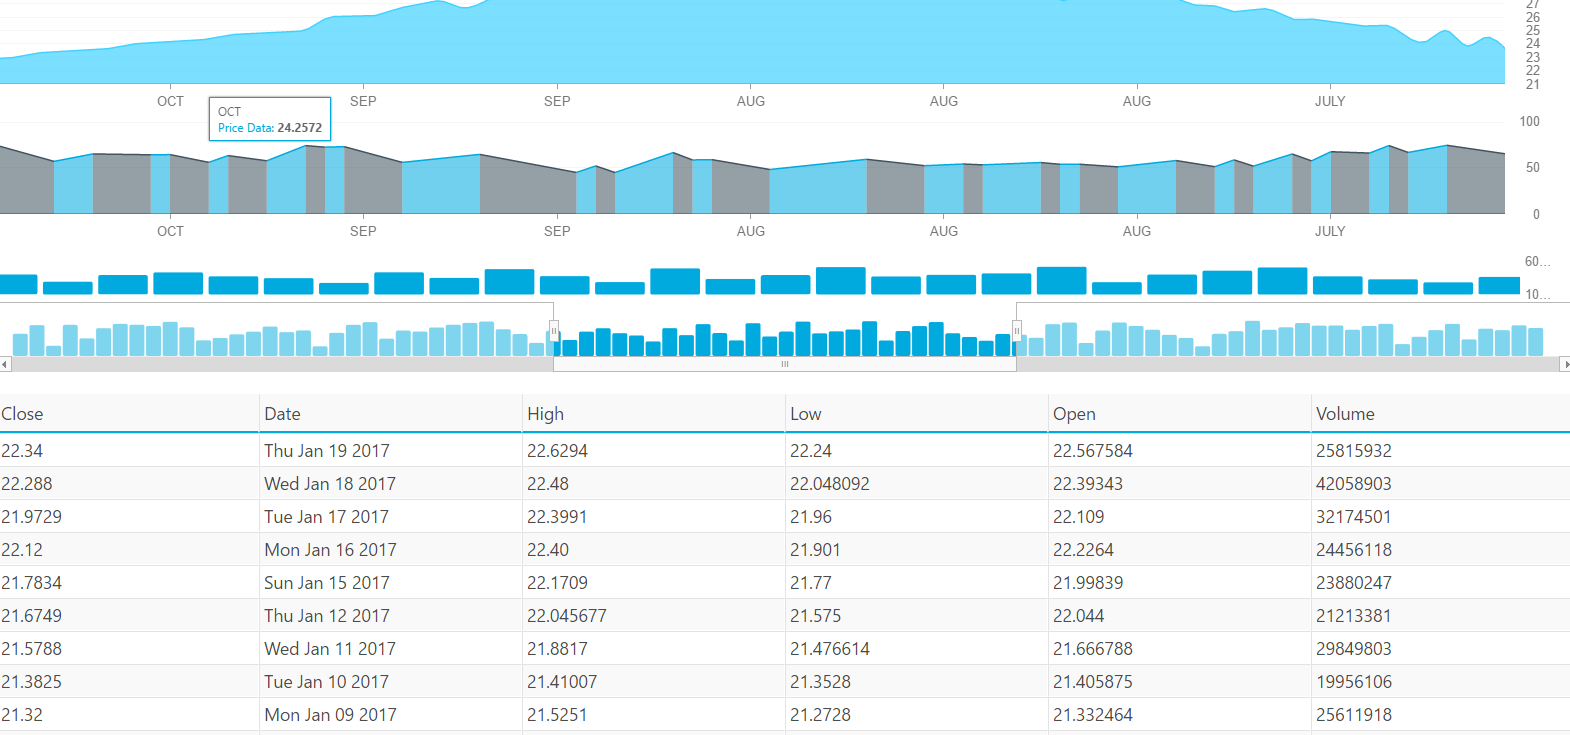
}Navigate to the application and scroll down to the bottom of the page to find the grid added as shown below:
Click on any of the columns to find that the grid is sorted for that particular column, as shown in the image above. In addition, you will notice that sorted column headers have sorting indicators applied, to distinguish sortable columns from the rest of the columns in the grid. Ignite UI also supports sorting on multiple columns.
You have configured sorting locally. Ignite UI for JavaScript also supports remote sorting. To learn more, see Remote Sorting for Ignite UI for JavaScript Grid.
Step 2 Enable Paging
You can enable paging on the Ignite UI for JavaScript grid by adding a feature named “Paging” in the grid. The Ignite UI for JavaScript Grid supports local and remote pagination.
To enable local paging, create an object with the following properties and add it to the features property of the grid option:
- name : set to Paging
- type : set to local
- pageSize : 5
You can also show or hide the size drop-down, or show or hide paging buttons, etc. The paging feature object would look like this:
{
  name: "Paging",
  type: "local",
  pageSize: 5
}
Add the above object in the features object array. To do that, open the file grid.component.ts and modify getGridFeatures() function such that it returns both paging and sorting features. After adding paging feature, getGridFeatures() function will look like below:
getGridFeatures() {
return [
{
name: "Sorting",
type: "local"
},
{
name: "Paging",
type: "local",
pageSize: 5
}
];
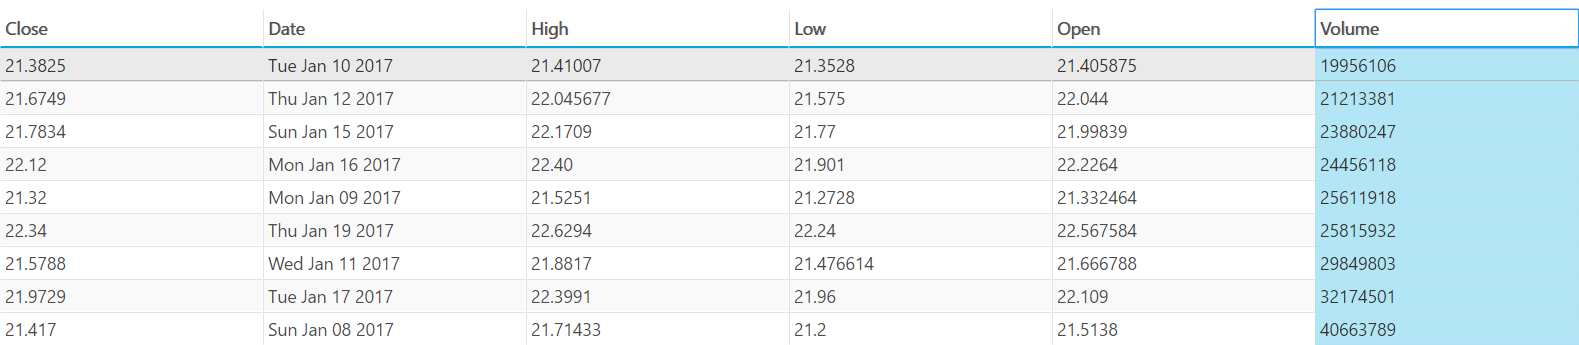
}To test the configured grid with paging: navigate to the application and scroll down to the bottom of the page to find the grid added as shown in the image below:

Ignite UI for JavaScript also supports remote paging. To learn more, see Remote Paging with Ignite UI for JavaScript Grid.
Step 3 Enable Filtering
To enable filtering in the Ignite UI for JavaScript grid, create an object with following properties and add it to the features property of the grid option:
- name : set to Filtering
- allowFiltering : set to true
- caseSensitive: set to false/true
The filtering feature object would look like this:
{
  name: "Filtering",
  allowFiltering: true,
  caseSensitive: false
}
Add the above object in the features object array. To do that, open the file grid.component.ts and modify getGridFeatures() function such that it returns paging, sorting, and filtering features. After the filtering feature is added, getGridFeatures() function will look like this:
getGridFeatures() {
return [
{
name: "Sorting",
type: "local"
},
{
name: "Paging",
type: "local",
pageSize: 5
},
{
name: "Filtering",
allowFiltering: true,
caseSensitive: false
}
];
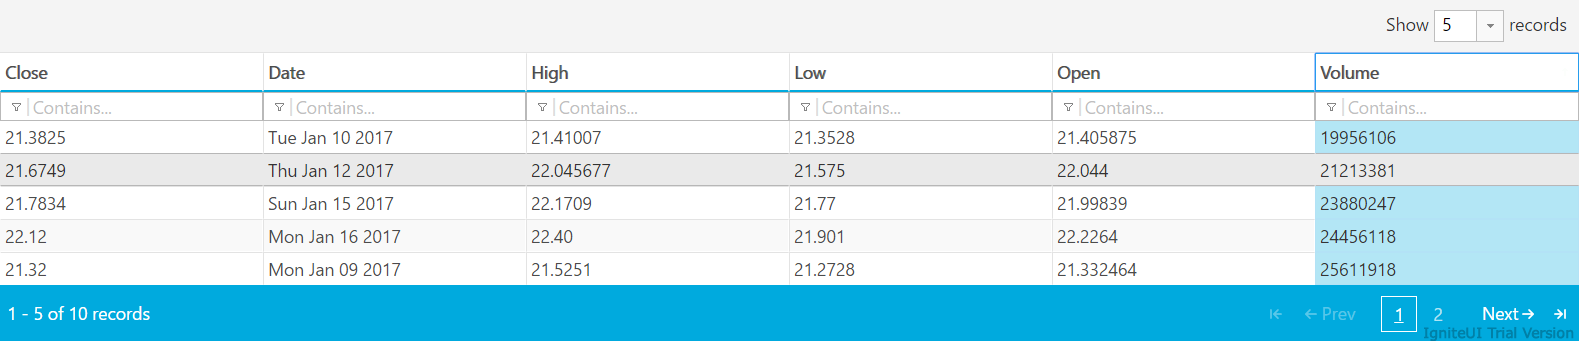
}To test the configured grid with filtering, navigate to the application and scroll down to the bottom of the page to find the grid added as shown below:
Conclusion
Ignite UI for JavaScript makes it possible to write your web applications faster. In addition to Angular, Ignite UI for JavaScript can be used in React, AngularJS, jQuery, and ASP.NET MVC.