SPlus.List.getItems(listUrl, viewName, fieldsValuesArray, onSuccess, onError, onCancel)
A bridge file called SharePlusBridge allows communication between SharePlus and your Mobile Workspaces. SharePlusBridge.js is a JavaScript file that includes a number of pre-defined APIs that you will use to achieve specific and controlled behavior. It is included in the WebDashboard section of the SharePlus Configuration File.
The SPlus prefix is always used to invoke the API and is placed before the methods.
SPlus.List.getItems(listUrl, viewName, fieldsValuesArray, onSuccess, onError, onCancel)When a SharePlus Mobile Workspace has finished loading, a function is called to notify that is ready and JavaScript functions are enabled. That function is SharePlusOnLoad and it allows you, for example, to load any custom settings that you may need.
When invoking API methods, you can force them to bypass SharePlus cache and get SharePoint content directly from the server. For further details, refer to DataManagerContext.
With this procedure, you will add functionality to display contact items from a list in SharePoint. You will use one of the pre-defined set APIs (List.getItems) and learn how to make the connection from your mobile workspace to the bridge.
The process has 4 required steps:
Enable the bridge in the Configuration File.
Open the Configuration File.
Navigate to the WebDashboard feature.
Enable the BridgeEnabled property.
This is necessary as you will use the SharePlusBridge in this procedure.
<key>WebDashboard</key>
<dict>
    <key>Settings</key>
    <dict>
    	<key>BridgeEnabled</key>
    <true/>
    </dict>
</dict>
Add a custom HTML page
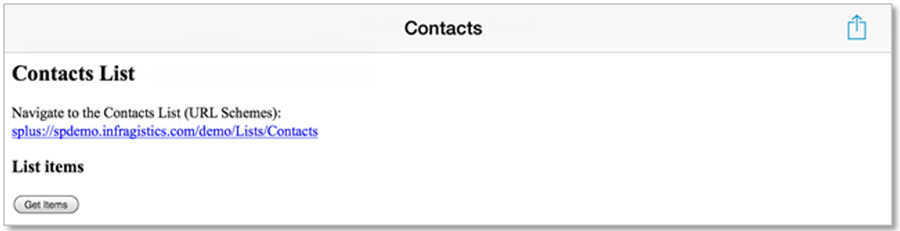
In this example, you will create a SharePlus Mobile Workspace that communicates with List.getItems API function to retrieve information from the Contacts list in SharePoint’s Demo site. These contact items will be displayed in a table. The URL Scheme to navigate to the list within SharePlus is also included.
The JavaScript code can be invoked from a button’s event, as shown in the following code snippet:
<html>
    <head>
        <script type=text/javascript>
        //JavaScript code to be included next…
        </script>
        </head>
    <body>
        <h2>Contacts List</h2>
        Navigate to the Contacts List (URL Schemes):<br>
        splus://spdemo.infragistics.com/demo/Lists/Contacts<br>

        <h3>List items</h3>
        <button onclick="javascript:getListItems()">Get Items</button><br>
        <br>
        <table id="listItemsTable" border="1">
        </table>
    </body>
</html>
Keep in mind that if a link to a SharePoint site is included in the HTML, that site must be configured within SharePlus before the content can be accessed.
The HTML page should look similar to this one:
Add JavaScript.
You will call the List.getItems method from the API, in order to get items from a SharePoint list.
Get the required information ready. The method receives the following parameters:
URL to the SharePoint site, name of the SharePoint list view, array of field values to be retrieved from each item.
A success callback function that receives an Array with the items.
An error callback function that receives a JavaScript Object with the error description
A cancel callback function that receives a JavaScript Object with relevant information
Syntax of the API method:
SPlus.List.getItems(listUrl, viewName, fieldsValuesArray, onSuccess, onError, onCancel)The code for specifying the URL, viewName, and fields parameters should be similar to the following code snippet:
var listUrl = 'http://spdemo.infragistics.com/demo/Lists/Contacts';
var viewName = 'All Contacts';
var fieldsArray = ['ows_Title','ows_FirstName','ows_Email','ows_Company'];
Call the List.getItems API method.
From your JavaScript code, you will call the bridge’s List.getItems method, passing all required parameters including the implementation of the callback functions. Should be similar to the following code snippet:
SPlus.List.getItems(listUrl, viewName, fieldsValuesArray, function (items) {
        //Loop through all the existing items
        for(var i = 0; i < items.length; i++) {
                //Get a reference to the item and all its fields
                var item = items[i];
                var title = item['ows_Title#displayValue'];
                ...
                //TODO: Add the item fields to the table displayed
        }
}, function (errorResponse) {
        SPlus.Utility.showMessage('ERROR: SPlus.List.getItems', errorResponse['error#displayValue']);
}, function (cancelResponse) {
        SPlus.Utility.showMessage('CANCEL: SPlus.List.getItems', cancelResponse);
});
Complete JavaScript code to be invoked from the button should be similar to the following code snippet:
function getListItems() {
    var viewName = 'All Contacts';
    var listUrl = 'http://spdemo.infragistics.com/demo/Lists/Contacts';
    var fieldsValuesArray = ['ows_Title','ows_FirstName','ows_Email','ows_Company'];

    SPlus.List.getItems(listUrl, viewName, fieldsValuesArray, function (items) {
        //Get a reference to the HTML table and create the Header row
        var tableId = "listItemsTable";
        var itemsTable = document.getElementById(tableId);
        var headerRow = document.createElement("tr");

        //Loop through the fieldValuesArray
        for(var f = 0; f < fieldsValuesArray.length; f++) {
            //Add the headers (ows_Title, ows_FirstName, etc.) to the Header row
            var field = fieldsValuesArray[f];
            var headerCol = document.createElement("th");
            headerCol.innerHTML = field;
            headerRow.appendChild(headerCol);
        }
        //Add the Header row to the table
        itemsTable.appendChild(headerRow);

        //Loop through all the existing items
        for(var i = 0; i < items.length; i++) {
            //Get a reference to the item and create the Item row
            var item = items[i];
            var itemRow = document.createElement("tr");

            //Loop through all the fields for an item
            for(var f = 0; f < fieldsValuesArray.length; f++) {
                //Add the field values to the Item row
                var field = fieldsValuesArray[f];
                var fieldName = field;
                var fieldValue = item[fieldName];
                var colField = document.createElement("td");
                colField.innerHTML = fieldValue;
                itemRow.appendChild(colField);
            }
            //Add every Item row to the table
            itemsTable.appendChild(itemRow);
            }
    }, function (errorResponse) {
        SPlus.Utility.showMessage('ERROR: SPlus.List.getItems', errorResponse['error#displayValue']);
    }, function (cancelResponse) {
    SPlus.Utility.showMessage('CANCEL: SPlus.List.getItems', cancelResponse);
    });
}
In the code above, the Utility.showMessage API method is called from the error callback function. For further details, see the Utility.showMessage API method.
For details about List.getItems in the API Reference, go to List.getItems.
(Optional) Check connection and URL availability
The use of Connection.isConnected and Utility.URL.isAvailable API methods is strongly recommended in some scenarios. The code should be similar to the code snippets included below:
SPlus.Connection.isConnected ( function (connected) {
    If not connected { SPlus.Utility.showMessage ('Connection Status','Not Connected')};
});
Please note that you can work without an internet connection. When working in offline mode and having all required resources already downloaded, you may work offline and synchronize your changes later.
var url = 'http://spdemo.infragistics.com/demo';

SPlus.Utility.URL.isAvailable(url, function (available) {
    If not available { SPlus.Utility.showMessage ('URL Status, 'URL is not available')
}, function (errorResponse){
SPlus.Utility.showMessage ('Is Url Available Error',errorResponse['error#displayValue']);
}, function (cancelResponse) {

});
Take into account that with no available connection the URL will never be available as well.
Display your SharePlus Mobile Workspace in SharePlus
Upload the ZIP file to SharePoint and configure it as the Application Home.
For details about this refer to the last step of Creating your first Customization.
Access the Application Home module in the SideBar.
